Showing posts with label Holiday.. Show all posts

28 March 2012

Irish Soda Bread and green cake.

(We aren't even Irish.)
I do realize that I totally missed the St Pats post by like two weeks, but I had to share Ina's Irish soda bread recipe because it was just so delicious. Anything Ina creates is a keeper in my book.
The bread is crunchy on the outside, soft and dense on the inside and made perfectly unhealthy with a generous helping of softened butter spread on top.
It would be a great complement to a Sunday roast, not just for that green day in March.

 
 Irish Soda Bread

  • 4 cups all-purpose flour, plus extra for currants
  • 4 tablespoons sugar
  • 1 teaspoon baking soda
  • 1 1/2 teaspoons kosher salt
  • 4 tablespoons (1/2 stick) cold unsalted butter, cut into 1/2-inch dice
  • 1 3/4 cups cold buttermilk, shaken
  • 1 extra-large egg, lightly beaten
  • 1 teaspoon grated orange zest
  • 1 cup dried currants*

Preheat the oven to 375 degrees F. Line a sheet pan with parchment paper.
Combine the flour, sugar, baking soda, and salt in the bowl of an electric mixer fitted with the paddle attachment. Add the butter and mix on low speed until the butter is mixed into the flour.
With a fork, lightly beat the buttermilk, egg, and orange zest together in a measuring cup. With the mixer on low speed, slowly add the buttermilk mixture to the flour mixture. Combine the currants with 1 tablespoon of flour and mix into the dough. It will be very wet.
Dump the dough onto a well-floured board and knead it a few times into a round loaf. Place the loaf on the prepared sheet pan and lightly cut an X into the top of the bread with a serrated knife. Bake for 45 to 55 minutes, or until a cake tester comes out clean. When you tap the loaf, it will have a hollow sound.
Cool on a baking rack. Serve warm or at room temperature.
 
*I used craisins instead of currants.  


 ...and while I'm at it, a photo of our [wannabe] Irish spread.
 I roasted the cabbage this year instead of cooking it in the meat juice. Thumbs up all around. 

...and an easy dessert. 
 
[green] Pistachio Cake

1 pkg yellow cake mix
1 box instant pistachio pudding
4 eggs
1 1/2 c water
1/4 c vegetable oil
1/2 tsp almond extract
green food coloring (optional)

Preheat oven to 350 degrees F (175 degrees C). Grease and flour 10 inch tube pan. 

In a large bowl mix together cake mix and pudding mix. Make a well in the center and pour in eggs, water, oil, almond extract and green food coloring. Blend ingredients, then beat for 2 minutes at medium speed. 

Pour into prepared 10 inch tube pan. Bake in the preheated oven for 50 to 55 minutes, or until cake springs back when lightly pressed. Cool in pan 15 minutes. Turn out onto a wire rack and cool completely.


Enjoy.

10 February 2012

Valentine sweets.

Here's an idea for Valentine's Day (or just something yummy to snack on!)--
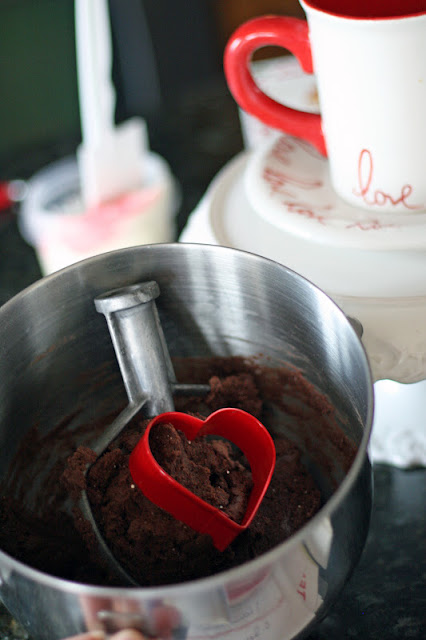
The kids and I "whooped" up a batch of these easy lovelies yesterday so we could get a head start on our Valentines before baby boy arrives.
It's a well known, easy recipe, but in case you don't have it, here it is:

Homemade Oreos

1 box devil's food cake mix
1/2 cup shortening
2 eggs

Preheat oven to 350. Mix cake mix with eggs and shortening. Roll into dime-sized balls (or press into a heart shaped cookie cutter in this case) and place on cookie sheet. Bake 4-5 minutes.

For the frosting:
8oz cream cheese, softened
1/2 stick butter
4 c powdered sugar
1 tsp vanilla
1tsp almond extract (optional)*
Mix together and frost backs of cookies and stick together. Note: its way easier and faster to pipe frosting out of a plastic bag.

*I obviously colored the frosting pink, and instead of almond extract, I added a little strawberry candy flavoring (only because I already had it).
  

09 January 2012

Wrapping up Christmas.

Have you moved on from Christmas yet?
Just one more Christmas-y post and I will move on, too.
I'm a little bit ashamed to admit that aside from taking the tree down, my Christmas decorations aren't put away yet, but I've been thinking about it... and that's the first step, right?

One of my very favorite things about the month of December is receiving Christmas greeting cards in the mail (unless you're like me and sent yours out the first week in Jan this year-- oops). Every day is like Christmas at the mail box. With that said, I feel so wasteful throwing them all away! 
So I don't. 
I stick to a trick my dear resourceful mother taught me so many many years ago... 
turn those greeting cards in gift tags! 
Does that make us cheap? 
Part of my Christmas clean-up every year includes sitting in front of a late night movie to turn those cards into tags. It doesn't take much time at all. 
They make for pretty packages and it's so nice to open my wrapping supply the following year to see that I am ready to wrap!

Trim them up. Punch a hole. Add a pretty ribbon.
Done.


What do you do with all those cards?


(Sorry mom, our cheapskate secret is out...)

03 January 2012

Picture a Christmas.

I can't believe Christmas has come and gone.... it was low key and simple. 
(So simple, that I didn't snap many photos..oops!)
A week spent in California made up for the fact that there was nothing even close to resembling a White Christmas here in Utah.
 But Santa Clause made a special visit to our house before we headed south. 

A Christmas Eve filled with anticipation.
Cookies and Milk.
Gingerbread houses.
Candles lit on a tree.
Cousins in matching jammies.
A tiny little Nativity. 

A very merry Christmas, indeed.


I am always so grateful for the reminder to reflect on our Savior 
and to remember that the joys we experience in our life are because of Him.  

I hope yours was very merry. 
xo

16 December 2011

Christmas Craft-- DIY Felt Trees.

I am dying for some new Christmas decor. But I just can't justify buying any this year because there are so many more important (and way more BORING) things we must spend our money on... the story of adulthood, right?
There are lots of leftover crafting supplies in my craft closet, so I decided to challenge myself and see what I could come up with using only what I had... 
newspaper 
plastic grocery bags
cardboard
hot glue 
white felt
candlestick(s)

Start by forming a cone out of newspaper (1) then stuffing it with either more newspaper or plastic grocery bags (2). Stuff them tight so the cone is really firm. (Important to NOTE: It would be a lot easier to use a styrofoam cone from the craft store, but remember, I was using only what I had.)  Trim the bottom of the cone so it will sit flat. Then trace the base of the cone onto cardboard. Cut the cardboard out, then trace the cardboard onto felt so you have two of the same size circles and glue them together (3). (You could totally skip this step if you use a styrofoam form.)

Cut out leaves from felt. I made my leaves about two inches long (4). You will need about 50 leaves for a 10-in tree. 
After cutting all the leaves out, use glue gun to run a thin line of glue down the middle of each leaf. Fold leaf in half over the glue to create a vein in the leaf (5). It doesn't take as long as it sounds like it would, I promise. 

Then, starting at the bottom of your cone, glue leaves on, overlapping, taking care to hide the newspaper (6). if you really wanted to, you could paint the newspaper white to help your cause.
After leaves are glued on attach the base of the tree to the candlestick using hot glue. 
If you don't want to dedicate a perfectly good candlestick, you can just set it on top then return it to the china cabinet when you're done with it.
And voila! A cute little tree. 
A forest of them all different sizes and heights would be adorable. 

Happy crafting and Merry Merry!


St. Lucia Update: 
So, even with the white dress and red sash all laid out and ready to go... we slept in instead.
The little Lucia woke up WAY TOO early and the little bean in my tummy had me tossing and turning all night. I'm not going to give up though.. we'll just pretend Dec 13th hasn't come yet!

08 December 2011

White Peppermint Fudge.


Looking for a quick dish to bring to your next potluck? I signed up to bring a Christmas treat to a dinner at church earlier this week. In desperation, I came up with this white fudge-y concoction. Everything else I went to make, I couldn't because I was missing a key ingredient (or two) and I wasn't about to load the kids in the car to go to the store. The angels started singing when I spotted a jar of marshmallow creme at the very bottom of my baking basket; I remembered that you can make easy fudge using that as the base. ANYway, this household thinks it turned out melt-in-your-mouth delicious. Plus, a bonus! Its super fast and super easy.  

White Peppermint Fudge

Line 9x13 pan with foil so it hangs over on all sides. 

Crush enough peppermint candies to make 1 cup. Spread 1/2 cup of that evenly over the bottom of the pan.

Melt 3/4 c butter in saucepan with 6 oz evaporated milk and 3 cups sugar.
Bring to a gentle boil and boil 4-5 minutes, stirring constantly, until thickened.
Remove from heat.

Add 3 cups white chocolate chips, 1 tsp vanilla and 1 jar marshmallow creme.

Stir vigorously until well combined.

Pour into pan, on top of crushed peppermint candies and level.

Sprinkle remaining 1/2 c of crushed peppermint on top evenly. It might be necessary to kind of press them into the fudge.

Let fudge stand at room temperature until solid, or put in refrigerator to speed up the process, about 25 min.

To cut, use foil "handles" to remove entire fudge block from pan and slice into squares using a sharp knife.

21 November 2011

The perfect Thanksgiving Table.

Thanksgiving is just a few days away, and I have been looking for tablescape inspiration everywhere.
These are a few of my favorites.

 
HGTV


Design Sponge.


Happy Thanksgiving!

07 December 2010

Deck the Halls.

Both times we looked at homes or prospective residences in the past, I always imagine what it will look like at Christmastime. Its just one of those things I have to think about logistically before signing any contracts. Well, I didn't do much in the way of decorations last year, being the first year in our house, and it took me way longer than it should have this year to Deck the Halls... especially considering that I didn't do that much (we are still in the middle of our little remodeling project, so I just decorated right over it). The end result is not quite what I imagined pre-contract, but it feels festive. And I guess that's the purpose of all of this, right? So mission accomplished! Hope your days are
Merry and Bright!
Related Posts Plugin for WordPress, Blogger...